🚀 Quickstart: AMD Versal VEK280
Author: Julien Posso (ONERA)
Date: 2026-03
Tags: AMD-Versal VEK280 Quickstart Getting Started Setup
This guide supplements the official AMD documentation by providing a high-level system view necessary to avoid common pitfalls during initial setup.
🔗 Useful Resources
- 📺 Official VEK280 Introduction Video
- 📖 Official VEK280 Board User Guide (UG1612)
- 🛠️ Field Note: Known VEK280 Boot Issues
- 🛠️ Field note: VEK280 Power Failure
📋 Prerequisites
Before proceeding with the board setup, it is mandatory to have your development environment ready. Without this, you will not be able to communicate with the board via UART or JTAG.
- Vitis & USB Drivers: You must have the AMD Vitis Toolchain and the necessary USB/JTAG cable drivers installed. If you haven't done this yet, please follow our dedicated guide: 🚀 Setup: AMD Vitis Toolchain.
🧠 Understanding the Dual-System Architecture
Unlike Zynq boards, the Versal features two distinct SoCs running in parallel:
- System Controller (Zynq UltraScale+ MPSoC):
- Role: Manages board peripherals (power, clocks, BEAM).
- Boot: Boots from factory-preconfigured eMMC.
- Interface: Has its own dedicated Ethernet port and UART.
- Versal MPSoC (Main Target):
- Role: The primary processor for your research, AI engines, and custom logic.
- Boot: Typically boots from JTAG or the SD Card. It also handles fan speed control.
🏁 Versal First Boot
Note on the 'In-Box' Quickstart
The QR code provided in the box (linking to amd.com/vek280-start) points to a guide that contains a MRMAC Example Design. This design requires an FMC card which is not provided with the standard VEK280 Evaluation Kit.
🛠️ SD Card Preparation
- Download the official VEK280 SD pre-built Image (
.wic) which contains the board platform: tested with v2025.1 SD Image; other versions available here. - Unzip the downloaded archive.
- Flash using Balena Etcher to write the WIC image to your micro SD card.
Tips for using Balena Etcher on Linux:
- Download the x64 (64-bit) (zip) version.
- Extract it and navigate to the
balenaEtcher-linux-x64folder. - Launch the application from a terminal with:
./balena-etcher --no-sandbox - Superuser authentication will be required to flash the card.
🔌 Hardware Setup
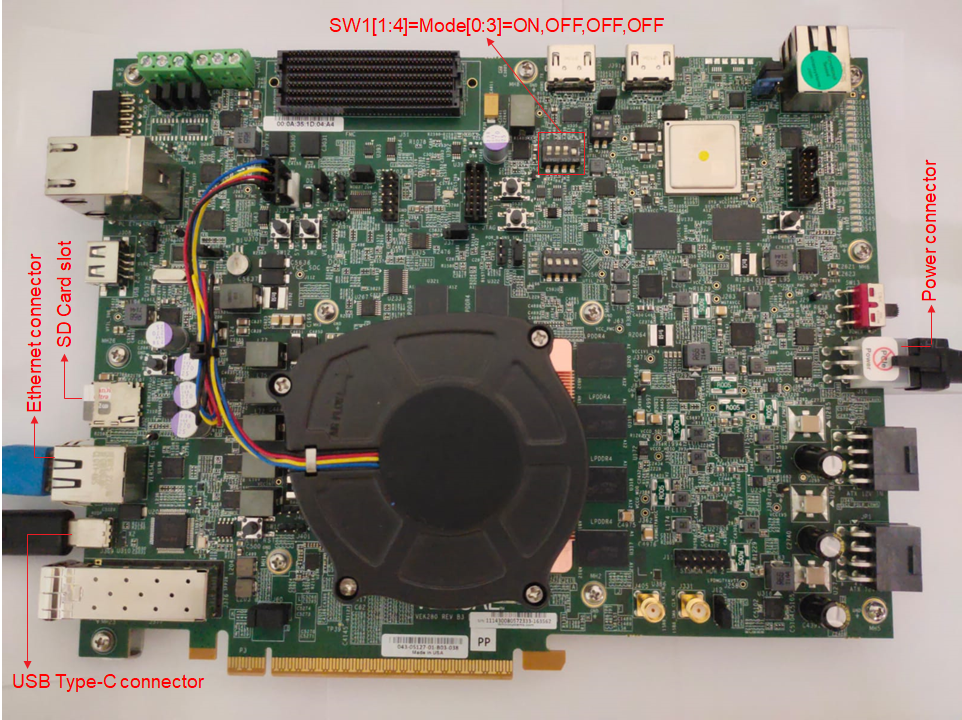
Follow the standard setup, noting these specific connections:
- Ethernet: Connect to the port located at the top right of the board (System Controller Ethernet) instead of the bottom-left shown in the image above (Versal Ethernet),facing a switch or your computer.
- USB: Connecting the board's USB port to your computer will reveal 3 COM ports:
- Port N (Interface 0): Versal UART0 – User Linux (SD Boot).
- Port N+1 (Interface 1): Versal UART1 via PL – Unused for now.
- Port N+2 (Interface 2): System Controller UART – Management Linux (eMMC Boot).
💻 Power On and Login
- Terminal: Open two serial console instances (e.g., Putty or Minicom) on Port N and Port N+2.
- Settings: 115200 baud, 8N1.
- Power: Toggle the SW13 power switch (located near the power connector) to ON.
- Observation:
- Dual Boot: You should see two Linux systems booting in parallel on your terminals.
- Status: Power Good LEDs should turn green.
- Prompt: You should reach a login prompt on both COM N and COM N+2 (on COM N+2, press Enter after the terminal displays the BEAM Tool Web Address to reach the login prompt).
Credentials:
- System Controller (COM N+2): Choose your preferred credentials.
- Versal UART (COM N): Use the default Petalinux credentials:
- Username:
petalinux - Password: Choose your password at the first prompt.
- Username:
🔍 Diagnostic Tool: BEAM
The BEAM (Board Evaluation and Management) tool allows you to verify board health. Access it via the System Controller web interface. Refer to the Xilinx Wiki for the official guide. Below are HEAT-specific tips.
🌐 Manual IP Configuration (Static IP)
If the System Controller fails to get an IP via DHCP, you must set a static IPv4 address manually via the UART.
- On the System Controller terminal (COM N+2), create the network file:
- Insert the following content (Adapt the IP/Gateway to your local network): !!! tip "Quick VI Tutorial" 1. Press "i" to enter insert mode. 2. Edit your file. 3. Press Escape to return to command mode. 4. Type ":wq" and press Enter to save and exit.
- Restart the System Controller:
Once rebooted, the BEAM URL should be accessible from a browser:
🔗 BEAM Web Address:
http://<your_ip>:50002
✅ Running the Tests
In the BEAM web interface, under "Test the Board":
- Board Settings: Manage GPIOs, clocks, FMC, and read real-time voltage/power consumption (e.g.,
VCC_INT). - Board Interface Test: Essential for new boards. It tests LEDs, switches, etc.
Important information
Instructions (e.g., "Press SWx") are displayed on the Versal UART (COM N). If you are not watching that terminal, some tests will appear to hang or fail.
🚀 Next Steps
Once your board is running, learn how to deploy AI models: